SHIMODA ACTION X30 V2


A little background ..

The search for the ideal camera bag can be likened to the search for the holy grail. The truth is that many of us will have a stash of bags each of which was purchased in good faith but either our requirements change or, in use, they fall short of our expectations or the marketing hype.

This is certainly true for me and I shudder to think how many bags I’ve had over the years. Though of course this does mean that I feel qualified to give an objective view on bags. Brands I have owned include Lowe-Pro, Tenba, Mindshift, Wandrd and Shimoda across a dozen or so models.

When selecting any photographic equipment the starting point for me is to consider exactly what my requirements are. There are so many choices it’s easy to be diverted down a rabbit hole or two!

As a landscape and travel photographer my three main criteria are that a bag should be able to hold the gear for the trip, be able to hold extras like waterproofs, insulation, hat, gloves, food and drink. Plus comply with airline carry on regulations and, ideally, have a slim profile. That’s not an easy ask with bags at one end of the spectrum being great for holding gear, but limited space for those vital extras, whilst at the other you have a great backpack that will hold plenty, though not necessarily designed to carry camera equipment or offer easy access. Thankfully bag design has improved over the years to better accommodate my needs.

After that there are a host of other important requirements to throw into the mix such as comfort, durability, quality materials, easy rear opening, pockets to carry the plethora of accessories and documents, the ability to hold a water bottle and tripod and to withstand the elements. Of course price is always a consideration though I’m happy to pay a premium providing that the product meets my needs and delivers.

I have some history with Shimoda as I have the original Explore 40 backpack which I have used for the past four years and been very impressed with the comfort and performance. However, there are one or two niggles such as only having one (huge) tripod pouch meaning a water bottle has to be stored inside the front zipped compartment. Whilst it’s a 40L capacity pack putting extra clothing etc in it results in a bulging pack which lacks style and looks like a big cube. However, the biggest issue for me is that it doesn’t comply with airline carry on regulations meaning I can’t use it for travel. The Explore range version 2 is now available with improvements to some, though not all of these issues.

I have recently been using a 31L roll top bag from another brand with a slim profile and versatile extra carrying capacity which is great for travel but again is not perfect and it isn’t the same quality as my original Shimoda Explore bag. So, when I had the opportunity to test and review the Action X30 I jumped at the chance and I haven’t been disappointed. Far from it in fact.

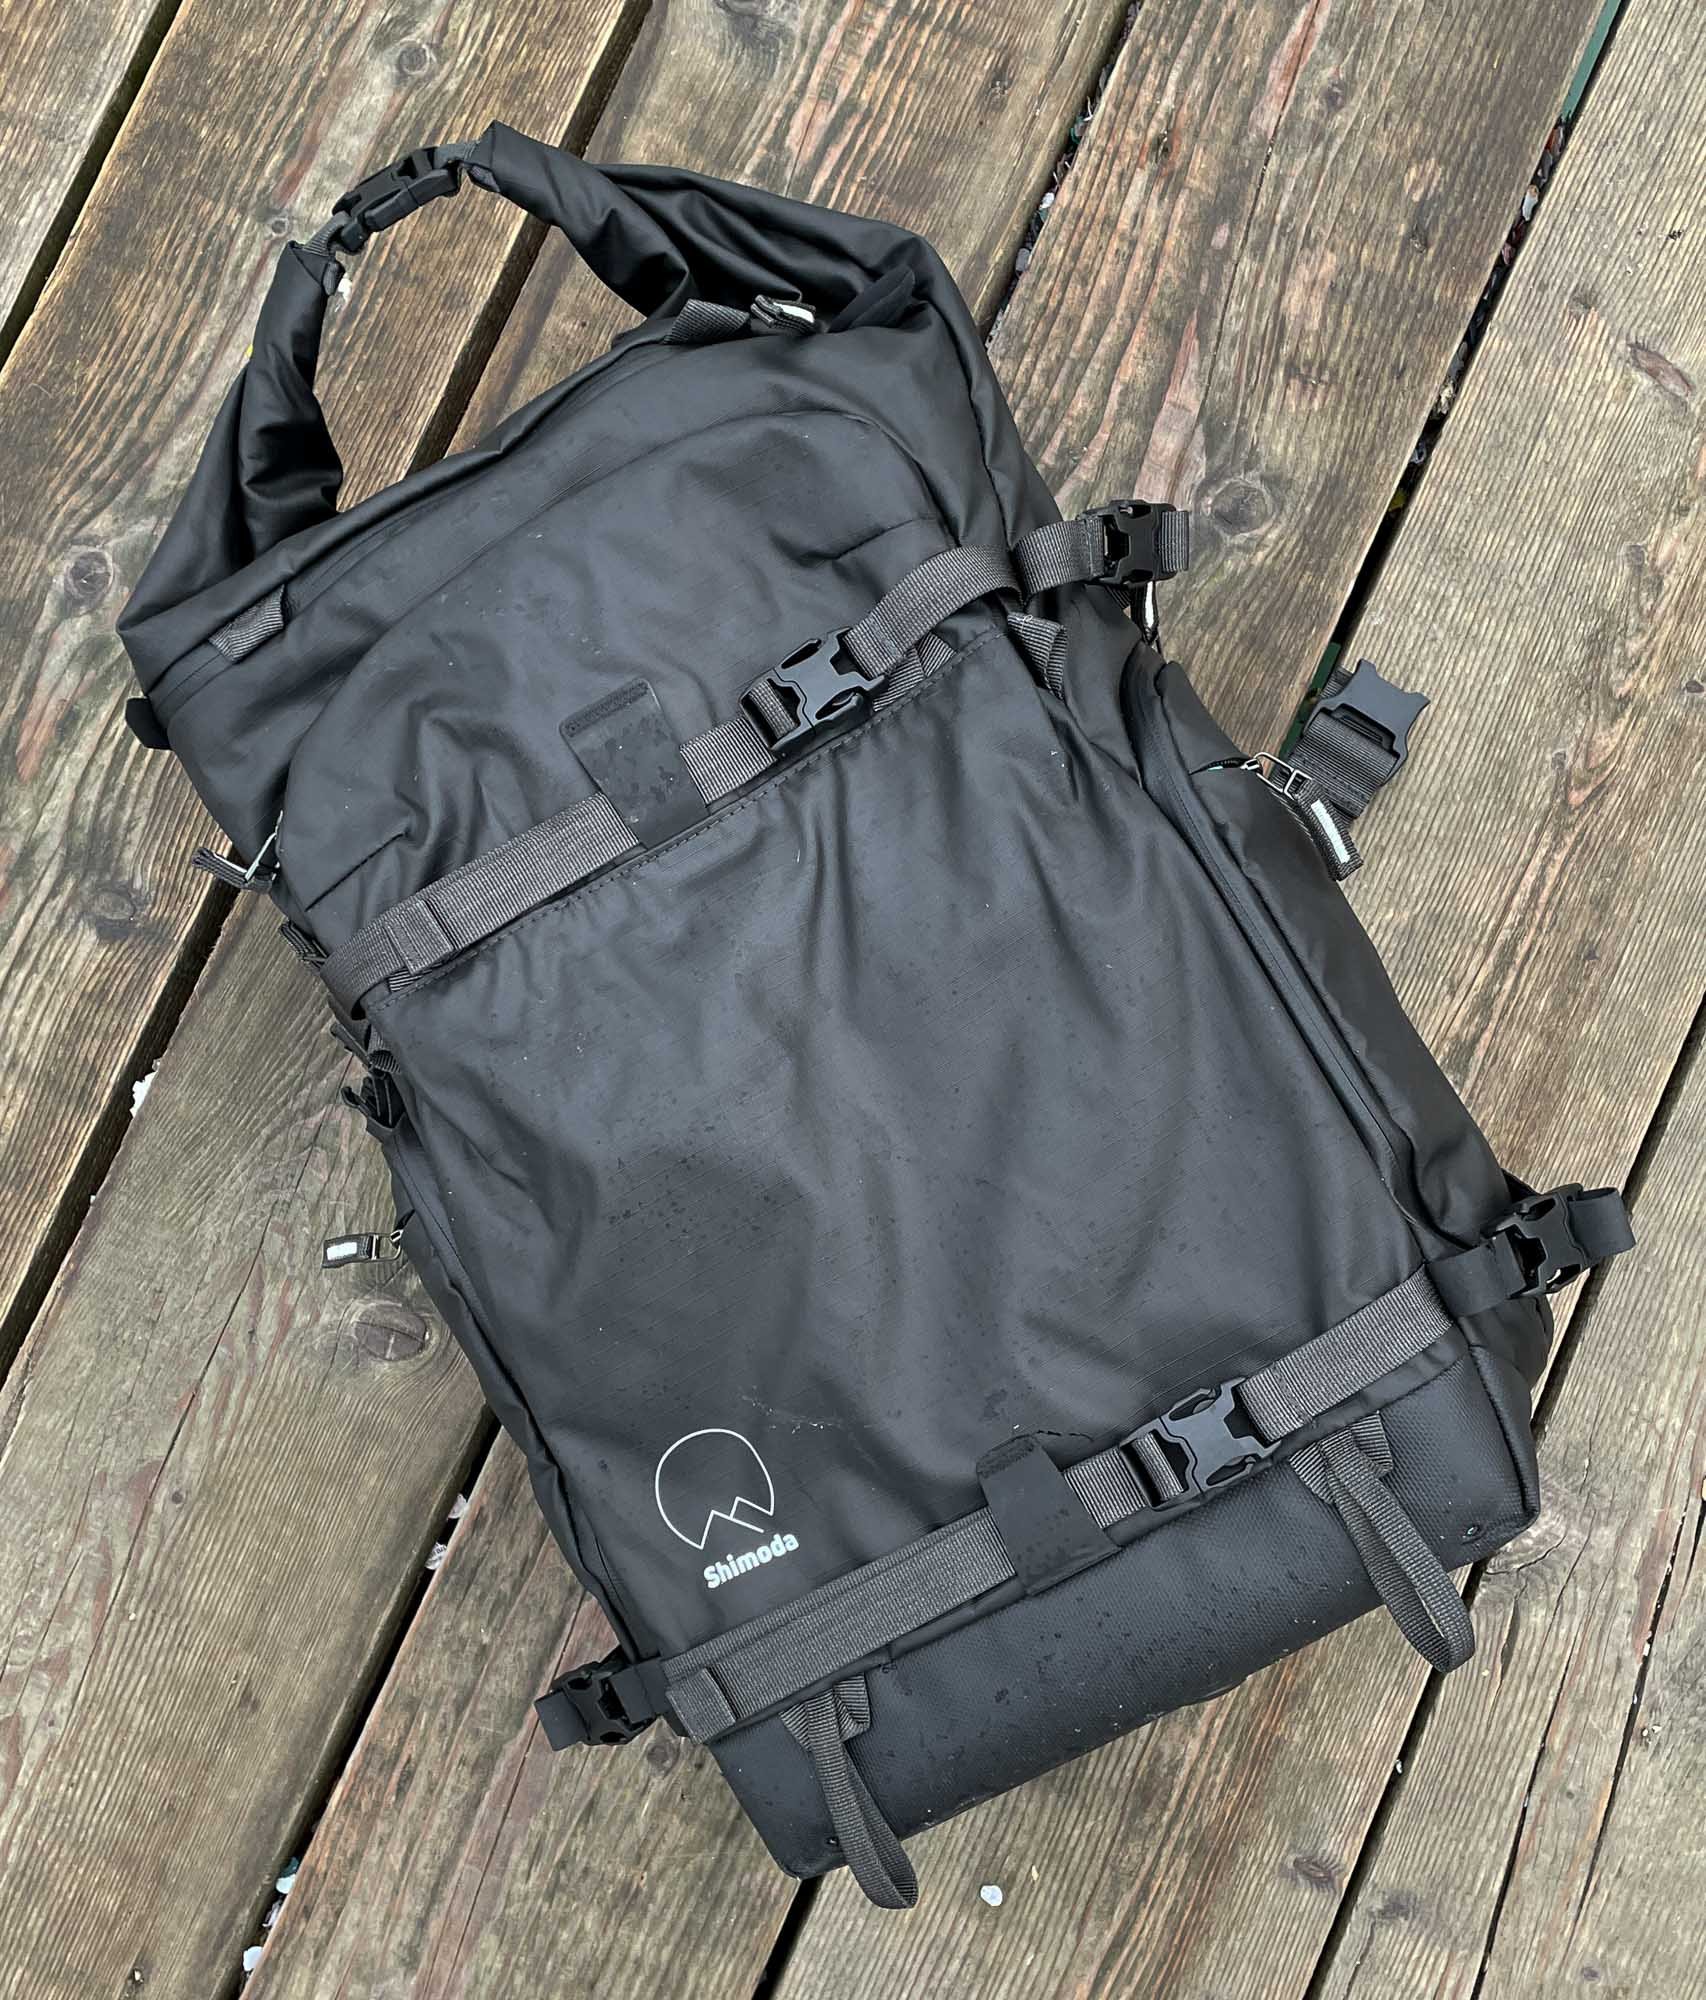
The Shimoda Action X30 v2

So what is the Shimoda Action X30 all about and how does it perform? Well, if you read the marketing blurb from Shimoda you need to be an all action super hero to use this bag. I quote “The Action X30 is designed for aggressive photographers looking for an efficient, fast access and compact backcountry camera bag. A lower-level TPU compression strap ensures greater durability when attaching skis, and its removable helmet strap lets users secure mountaineering, ski or bike helmets to the outside of their pack”. In reality it may well tick all those boxes but I can’t help but think they are also missing a trick in not targeting a wider audience of lesser mortals …. like me! I’m not an action sports photographer, I need a quality, functional bag for travel and landscape photography.


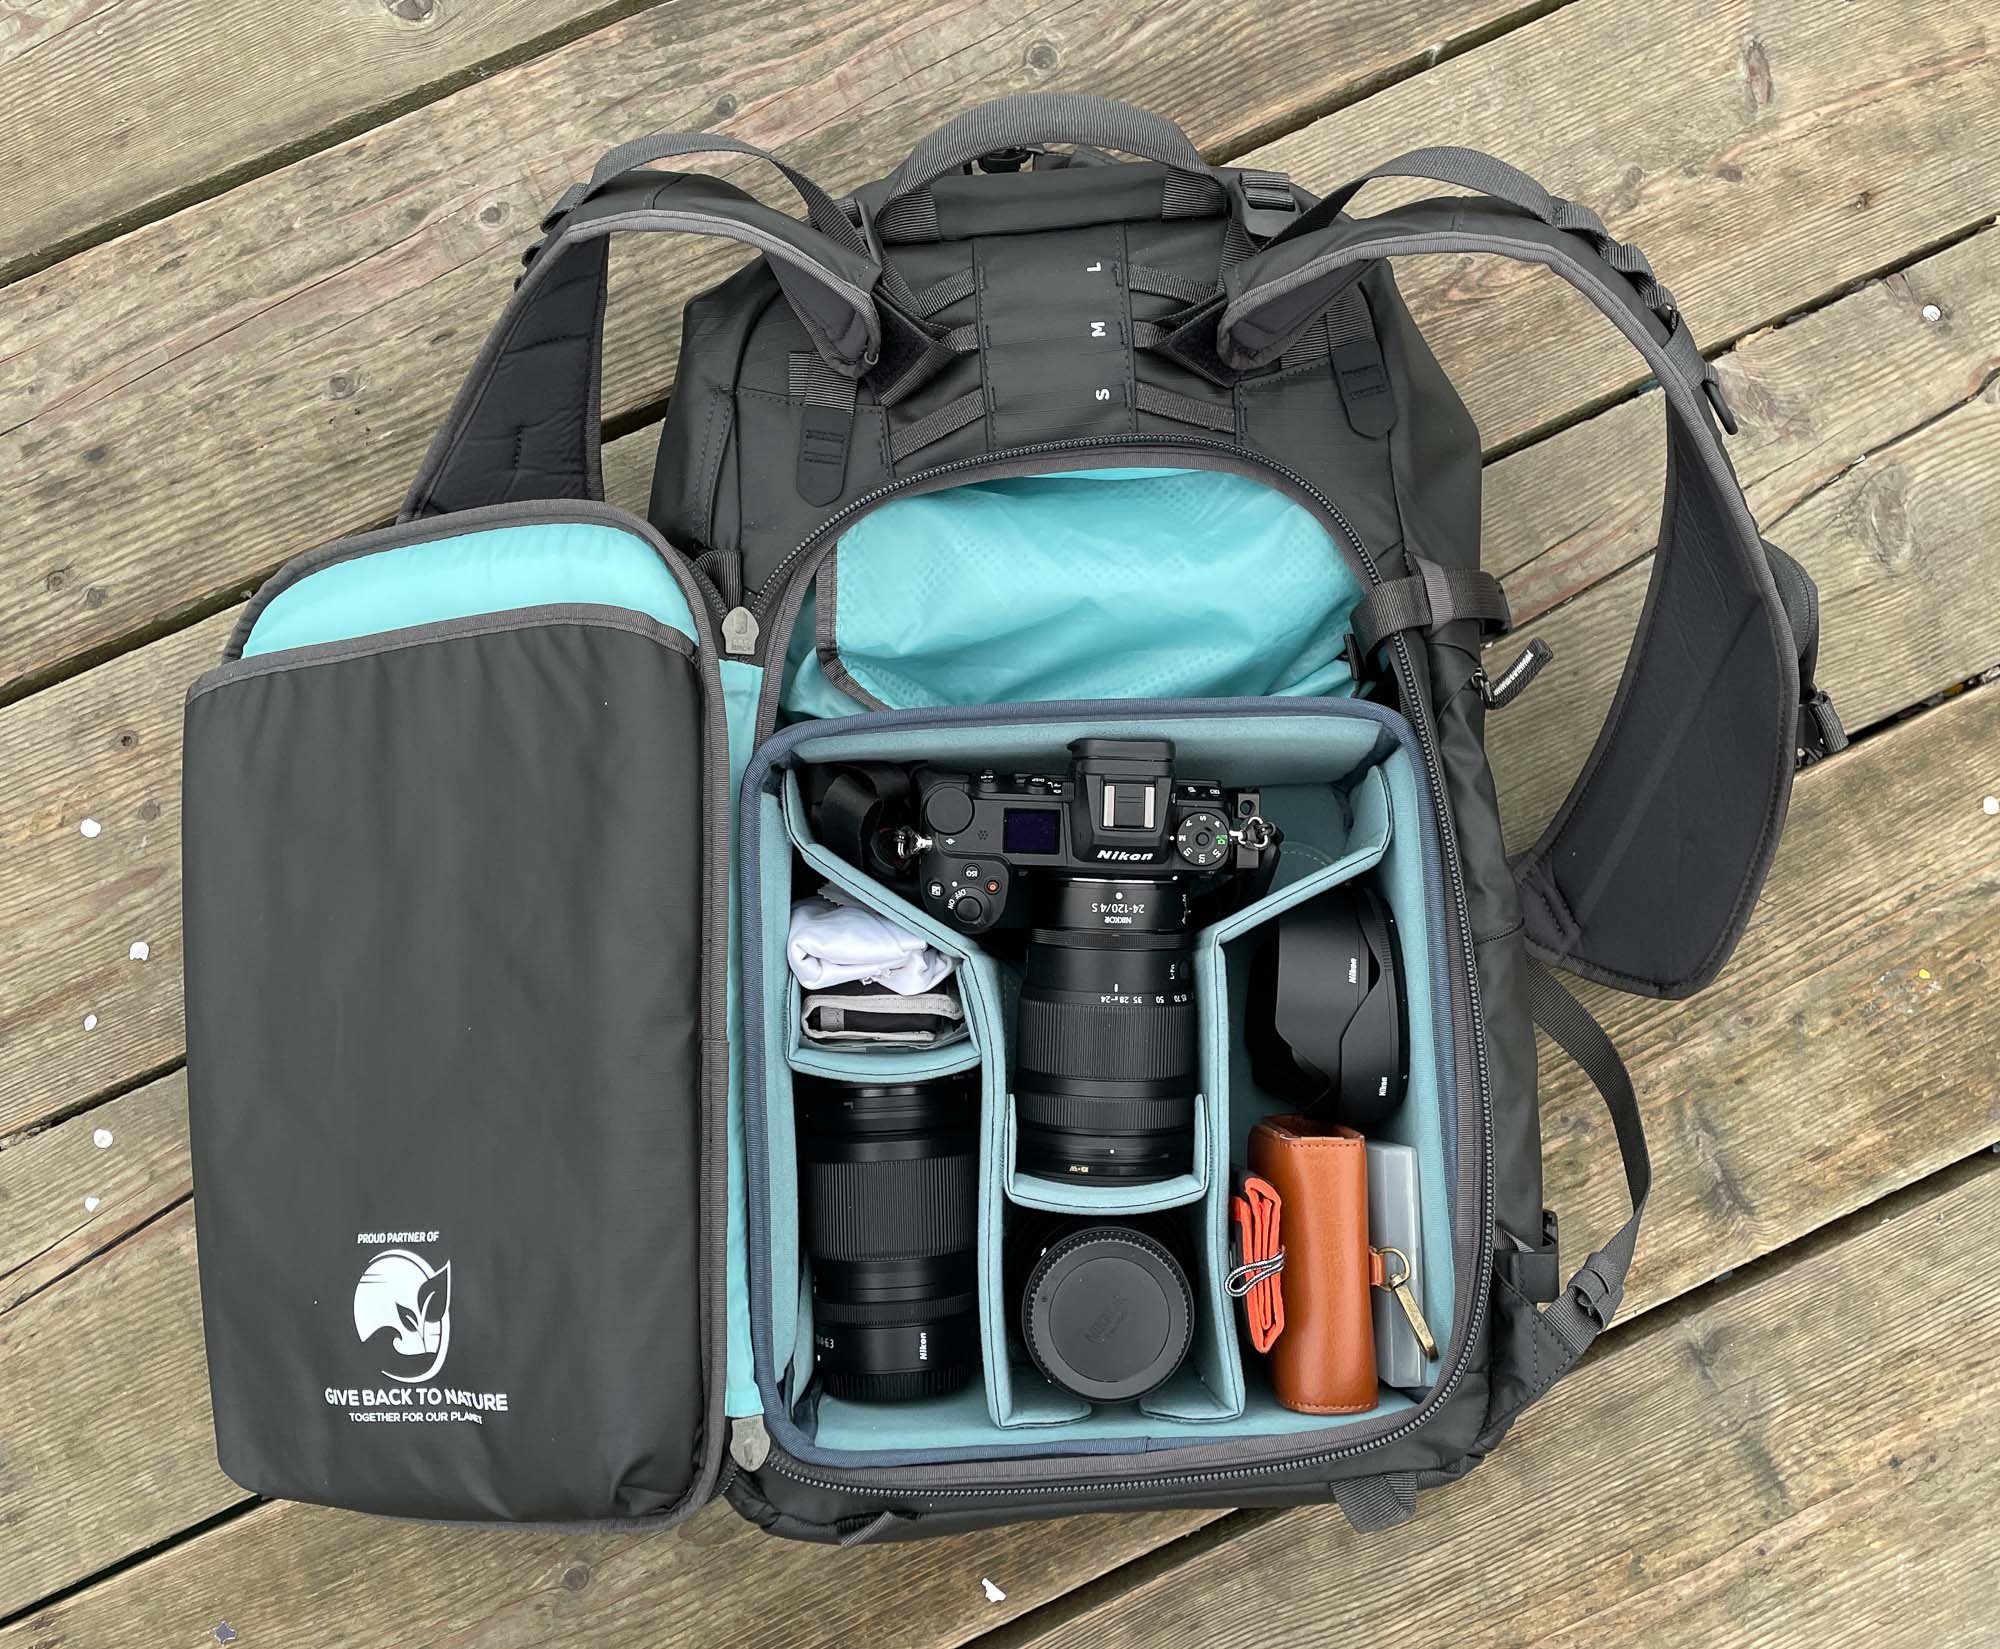
As the name implies, the Action X range is for anyone combining outdoor pursuits with photography and requiring the best possible protection for gear without excessive weight. They feature roll-top access, a compressible bag volume, and multiple attachment points for equipment up to ski size. There are three sizes, 70L, 50L and 30L available in two colours black and “army” green. They work on the concept of using a removable camera insert to suit your needs – the 30L is matched with the Medium Mirrorless unit. This smart, simple unit will accommodate most mirrorless and DSLR cameras. They are not overly padded either, though provide sufficient protection whilst optimising the amount of gear you can fit in the unit.


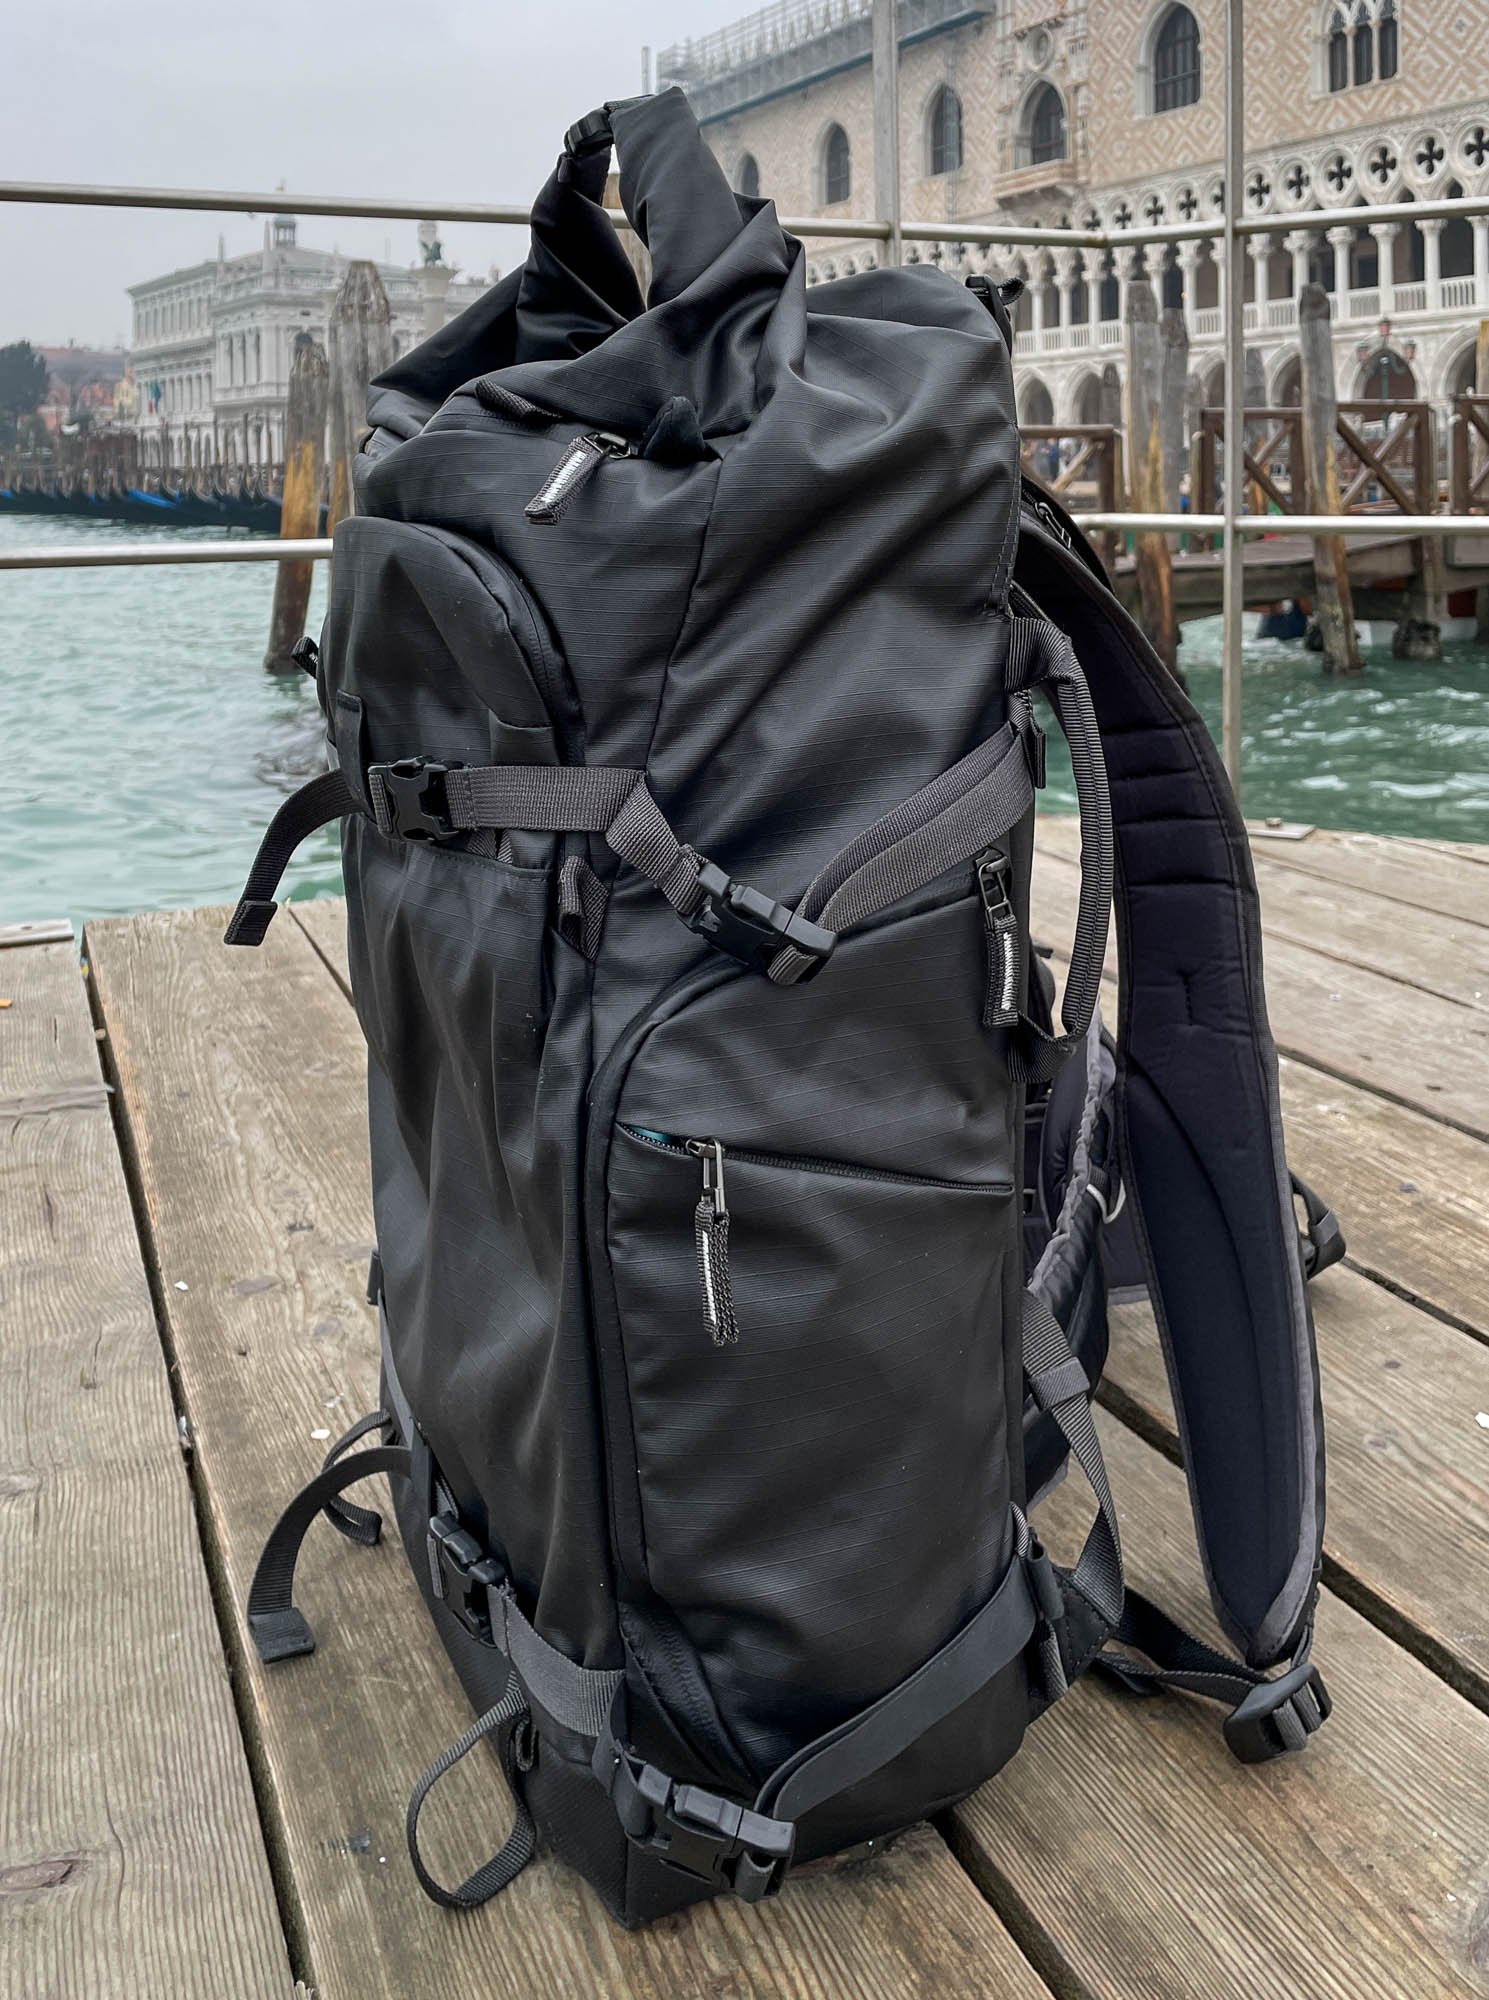
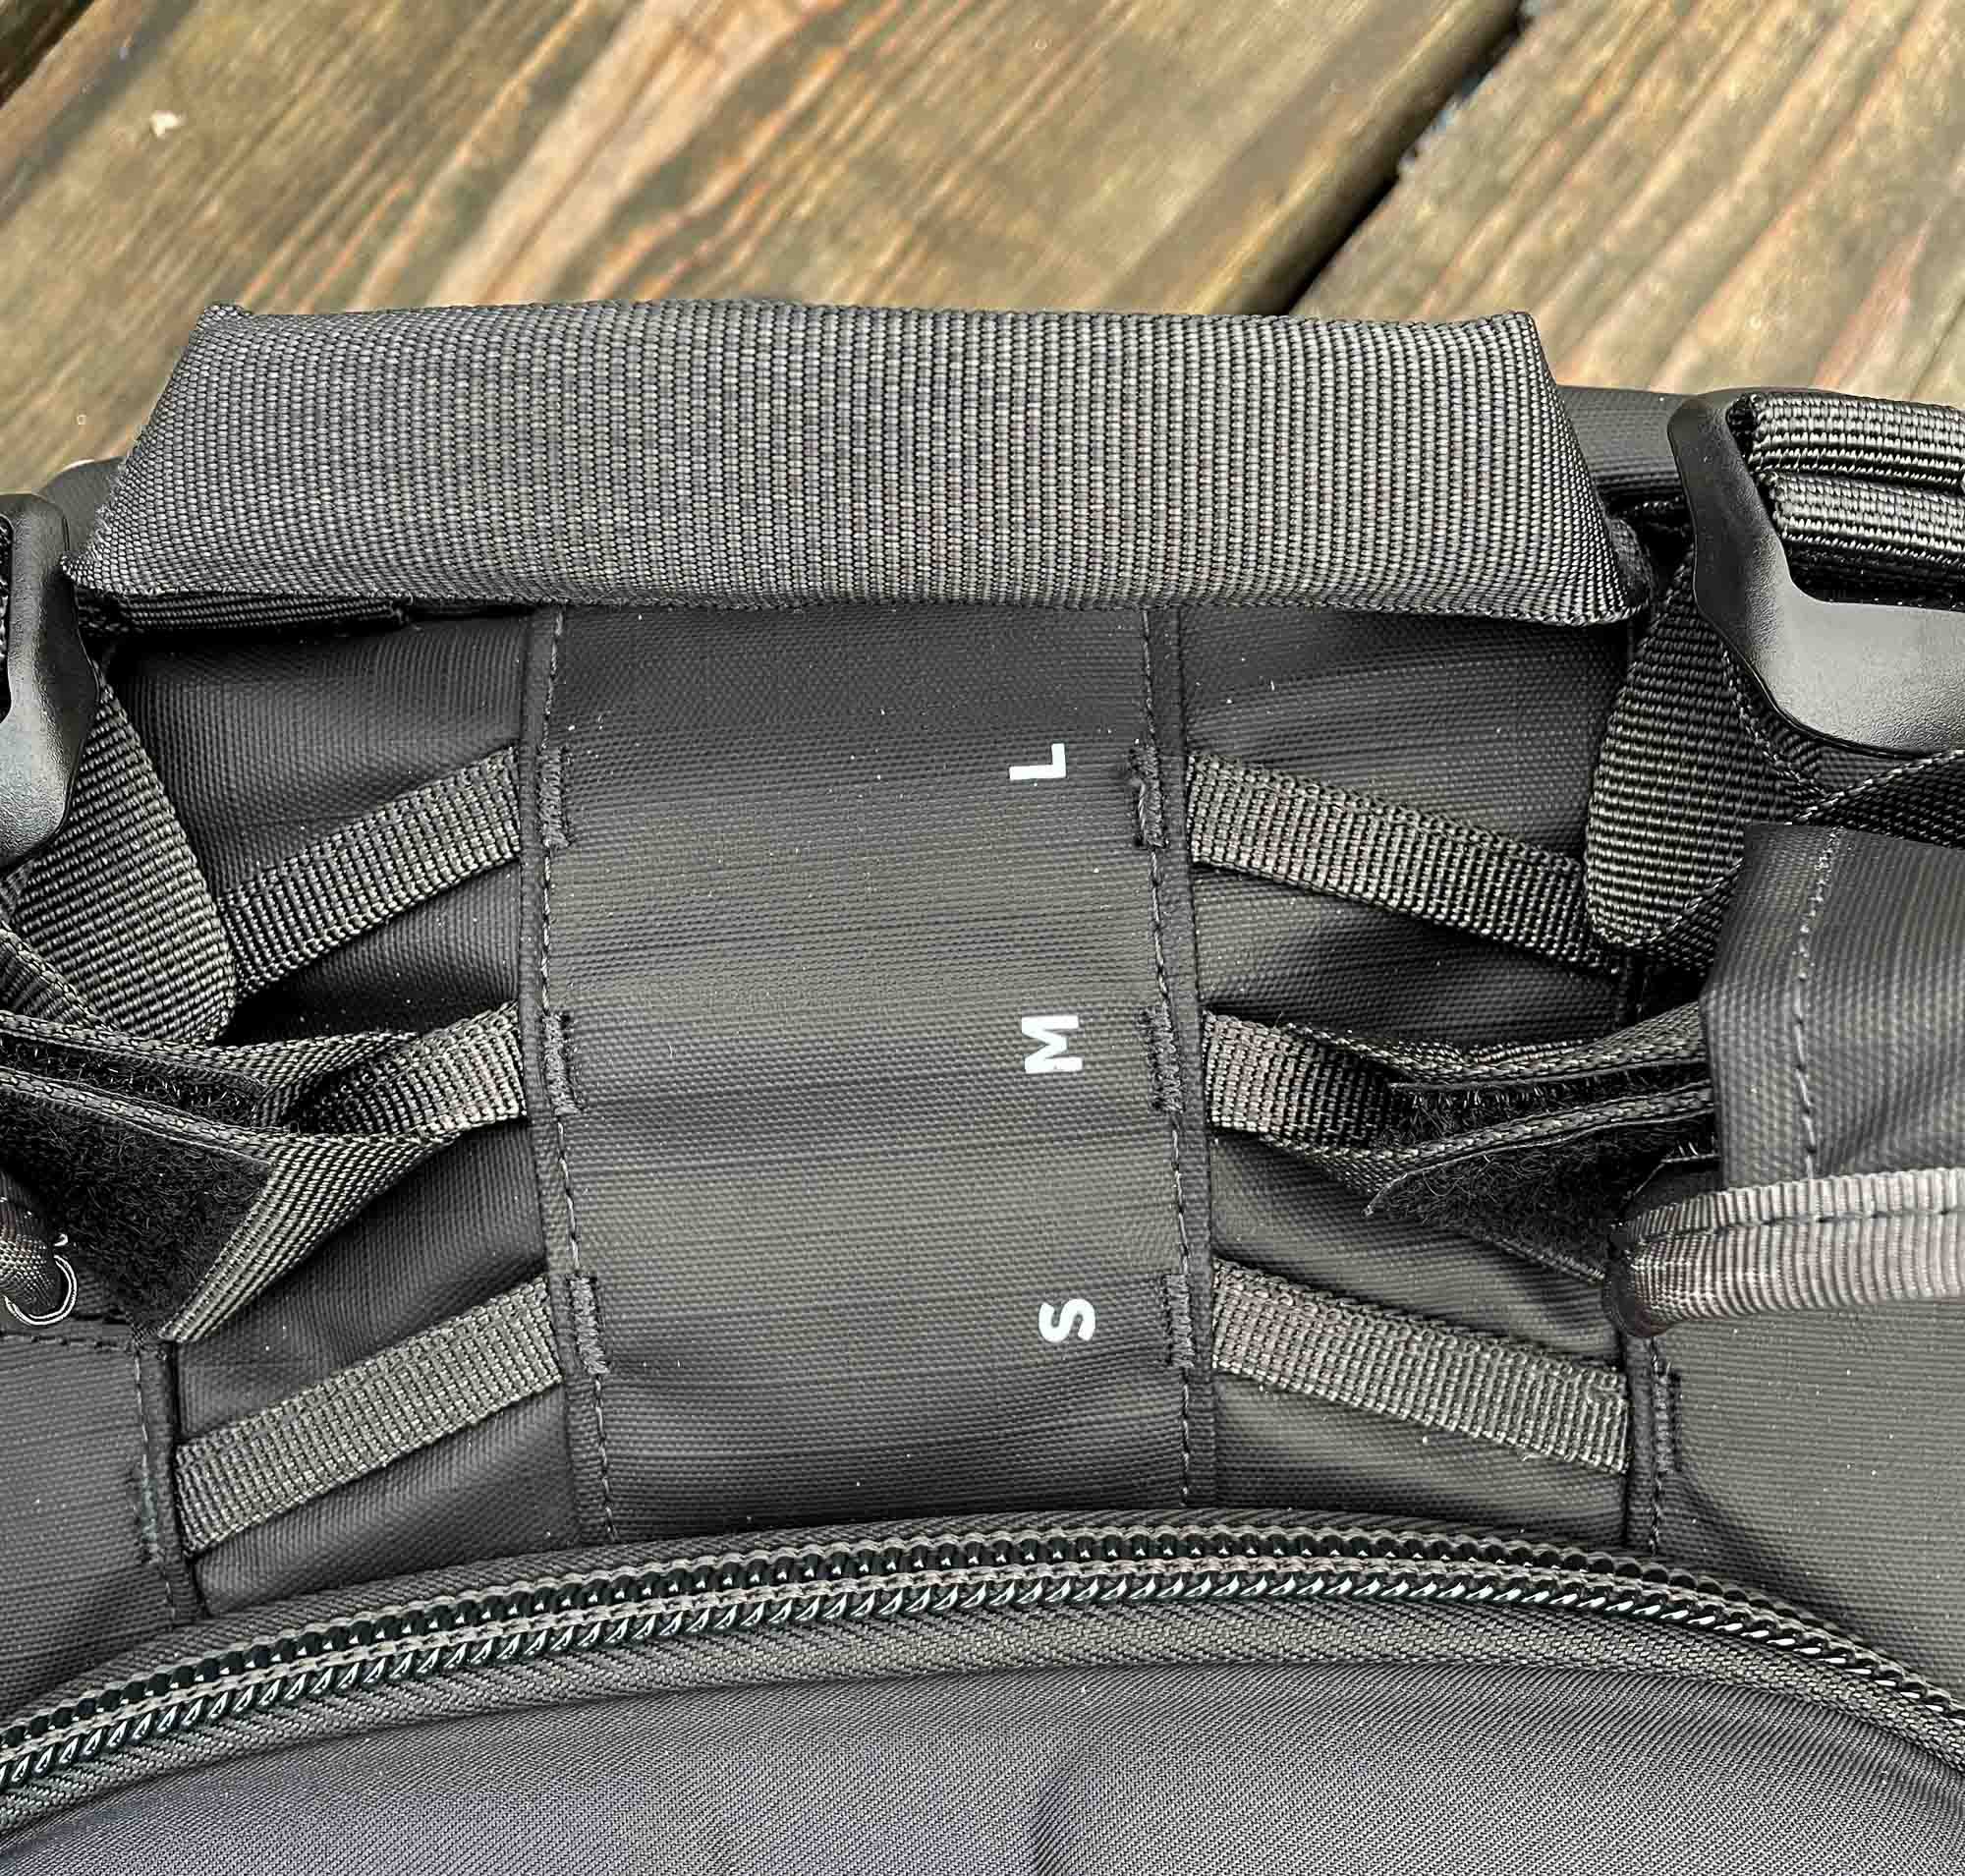
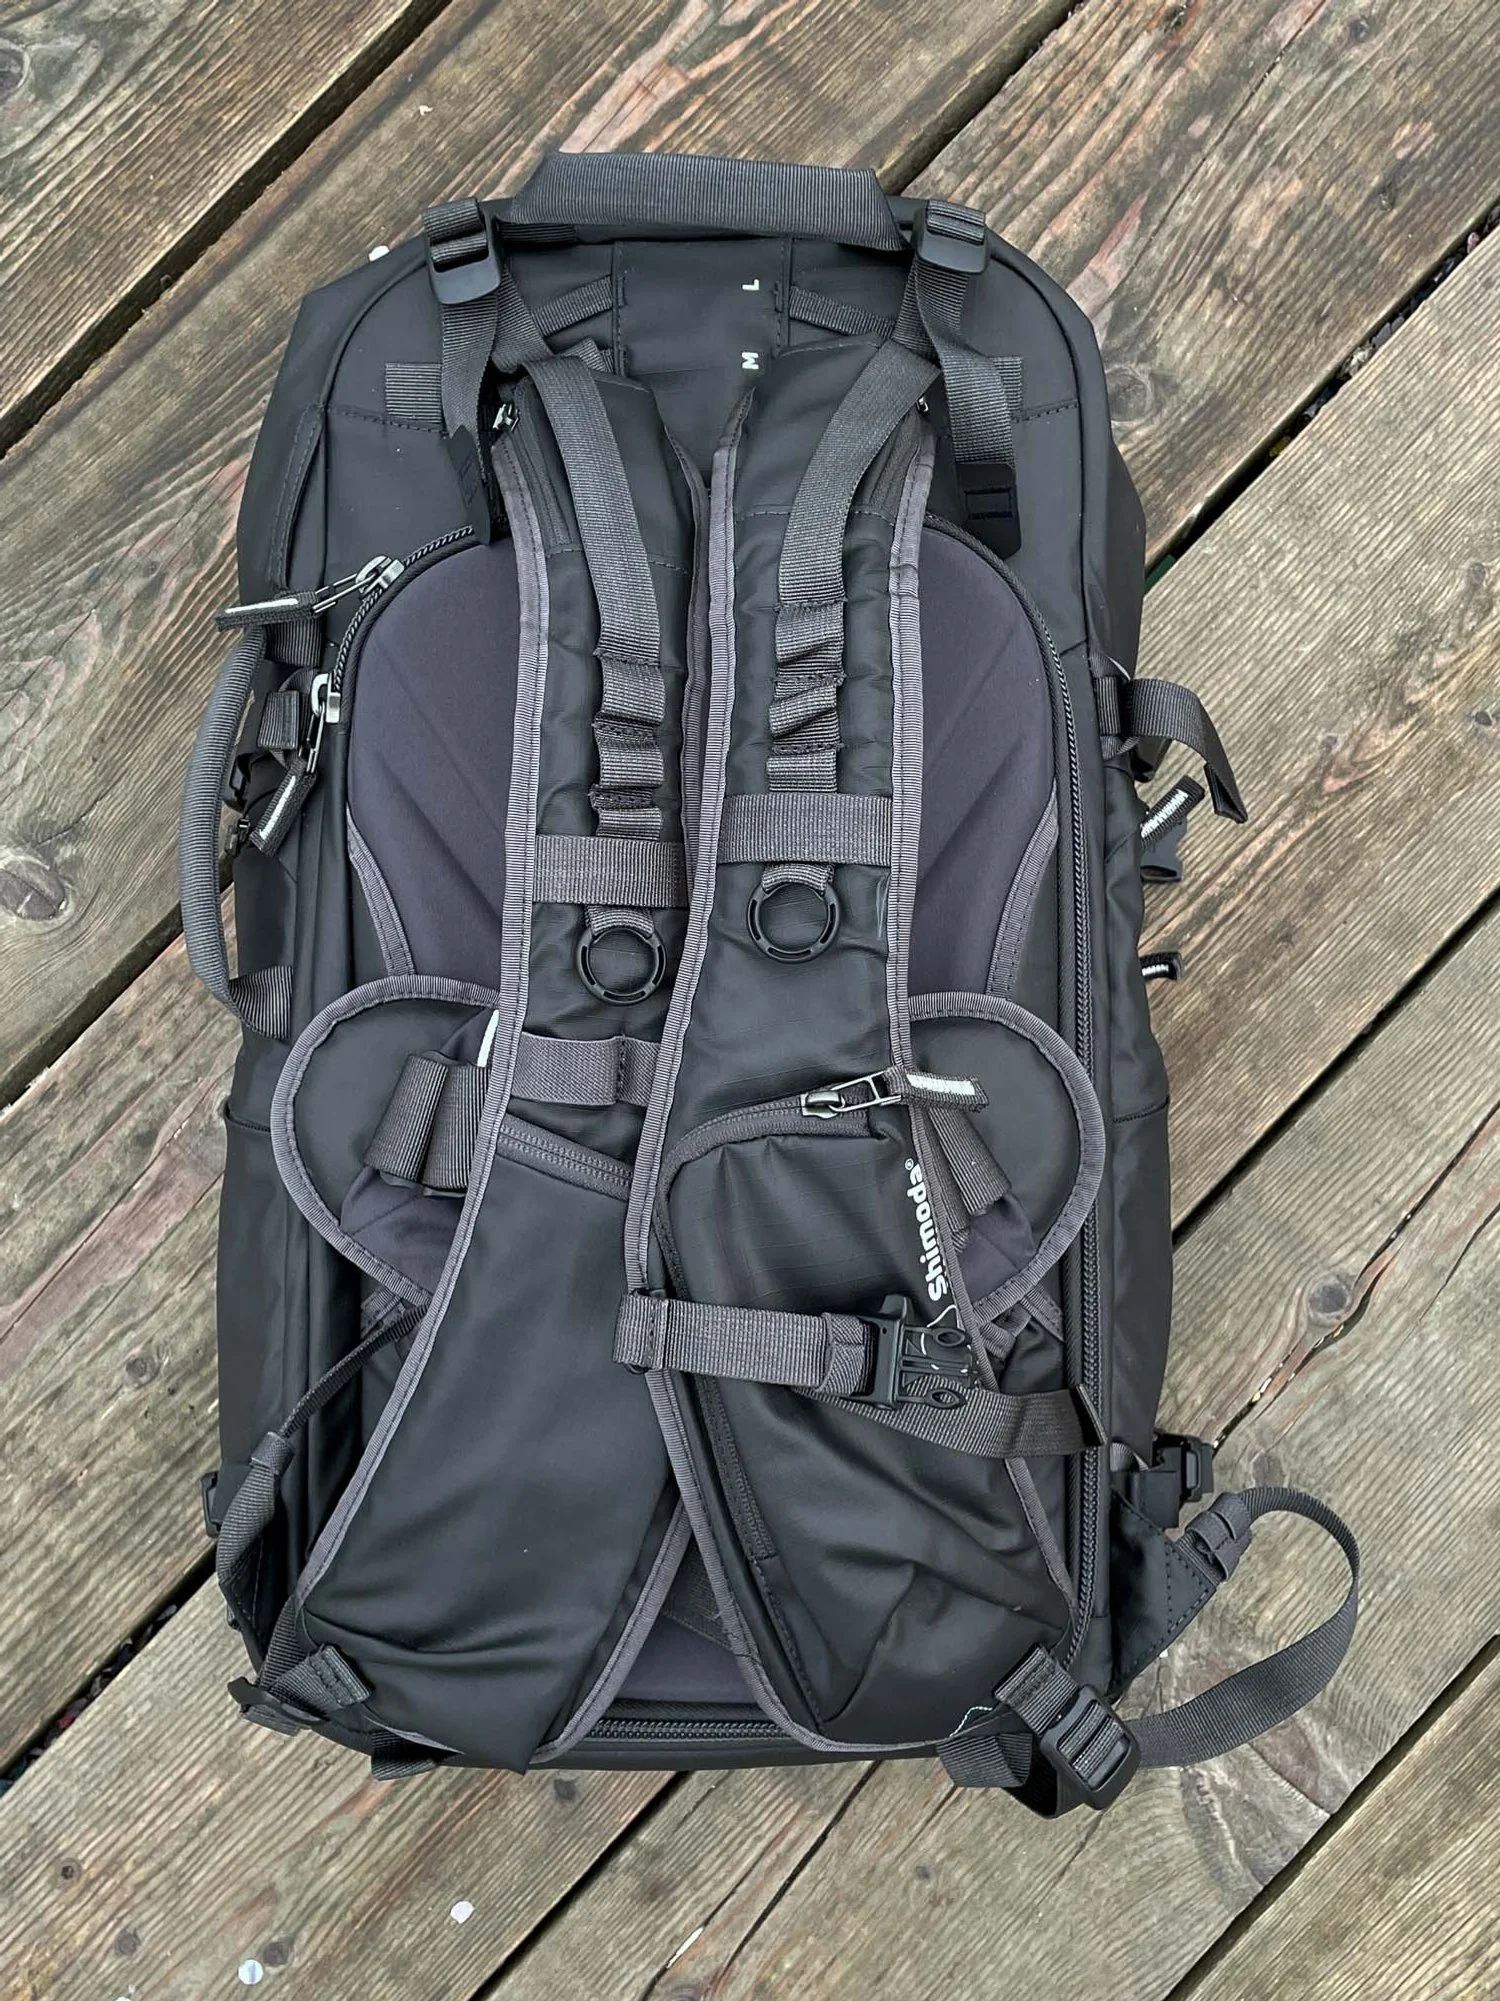
One of the most important factors is the fit and comfort of the pack, especially when carrying a fully loaded camera unit, accessories and tripod. I’ve always found Shimoda packs incredibly supportive and comfortable. The X30 offers 3 height options with approximately 10 cm of vertical adjustment. This means the same backpack can fit short or tall, male or female, torso heights, ensuring a custom fit for everyone. The contoured straps feature two easy-reach accessory pockets to carry most phones, water bottles or personal accessories. Female customers have the option of choosing a set of Women’s Straps to be included with their backpack order at no charge.
The bags conveniently stand up when placed on their base, great when travelling.

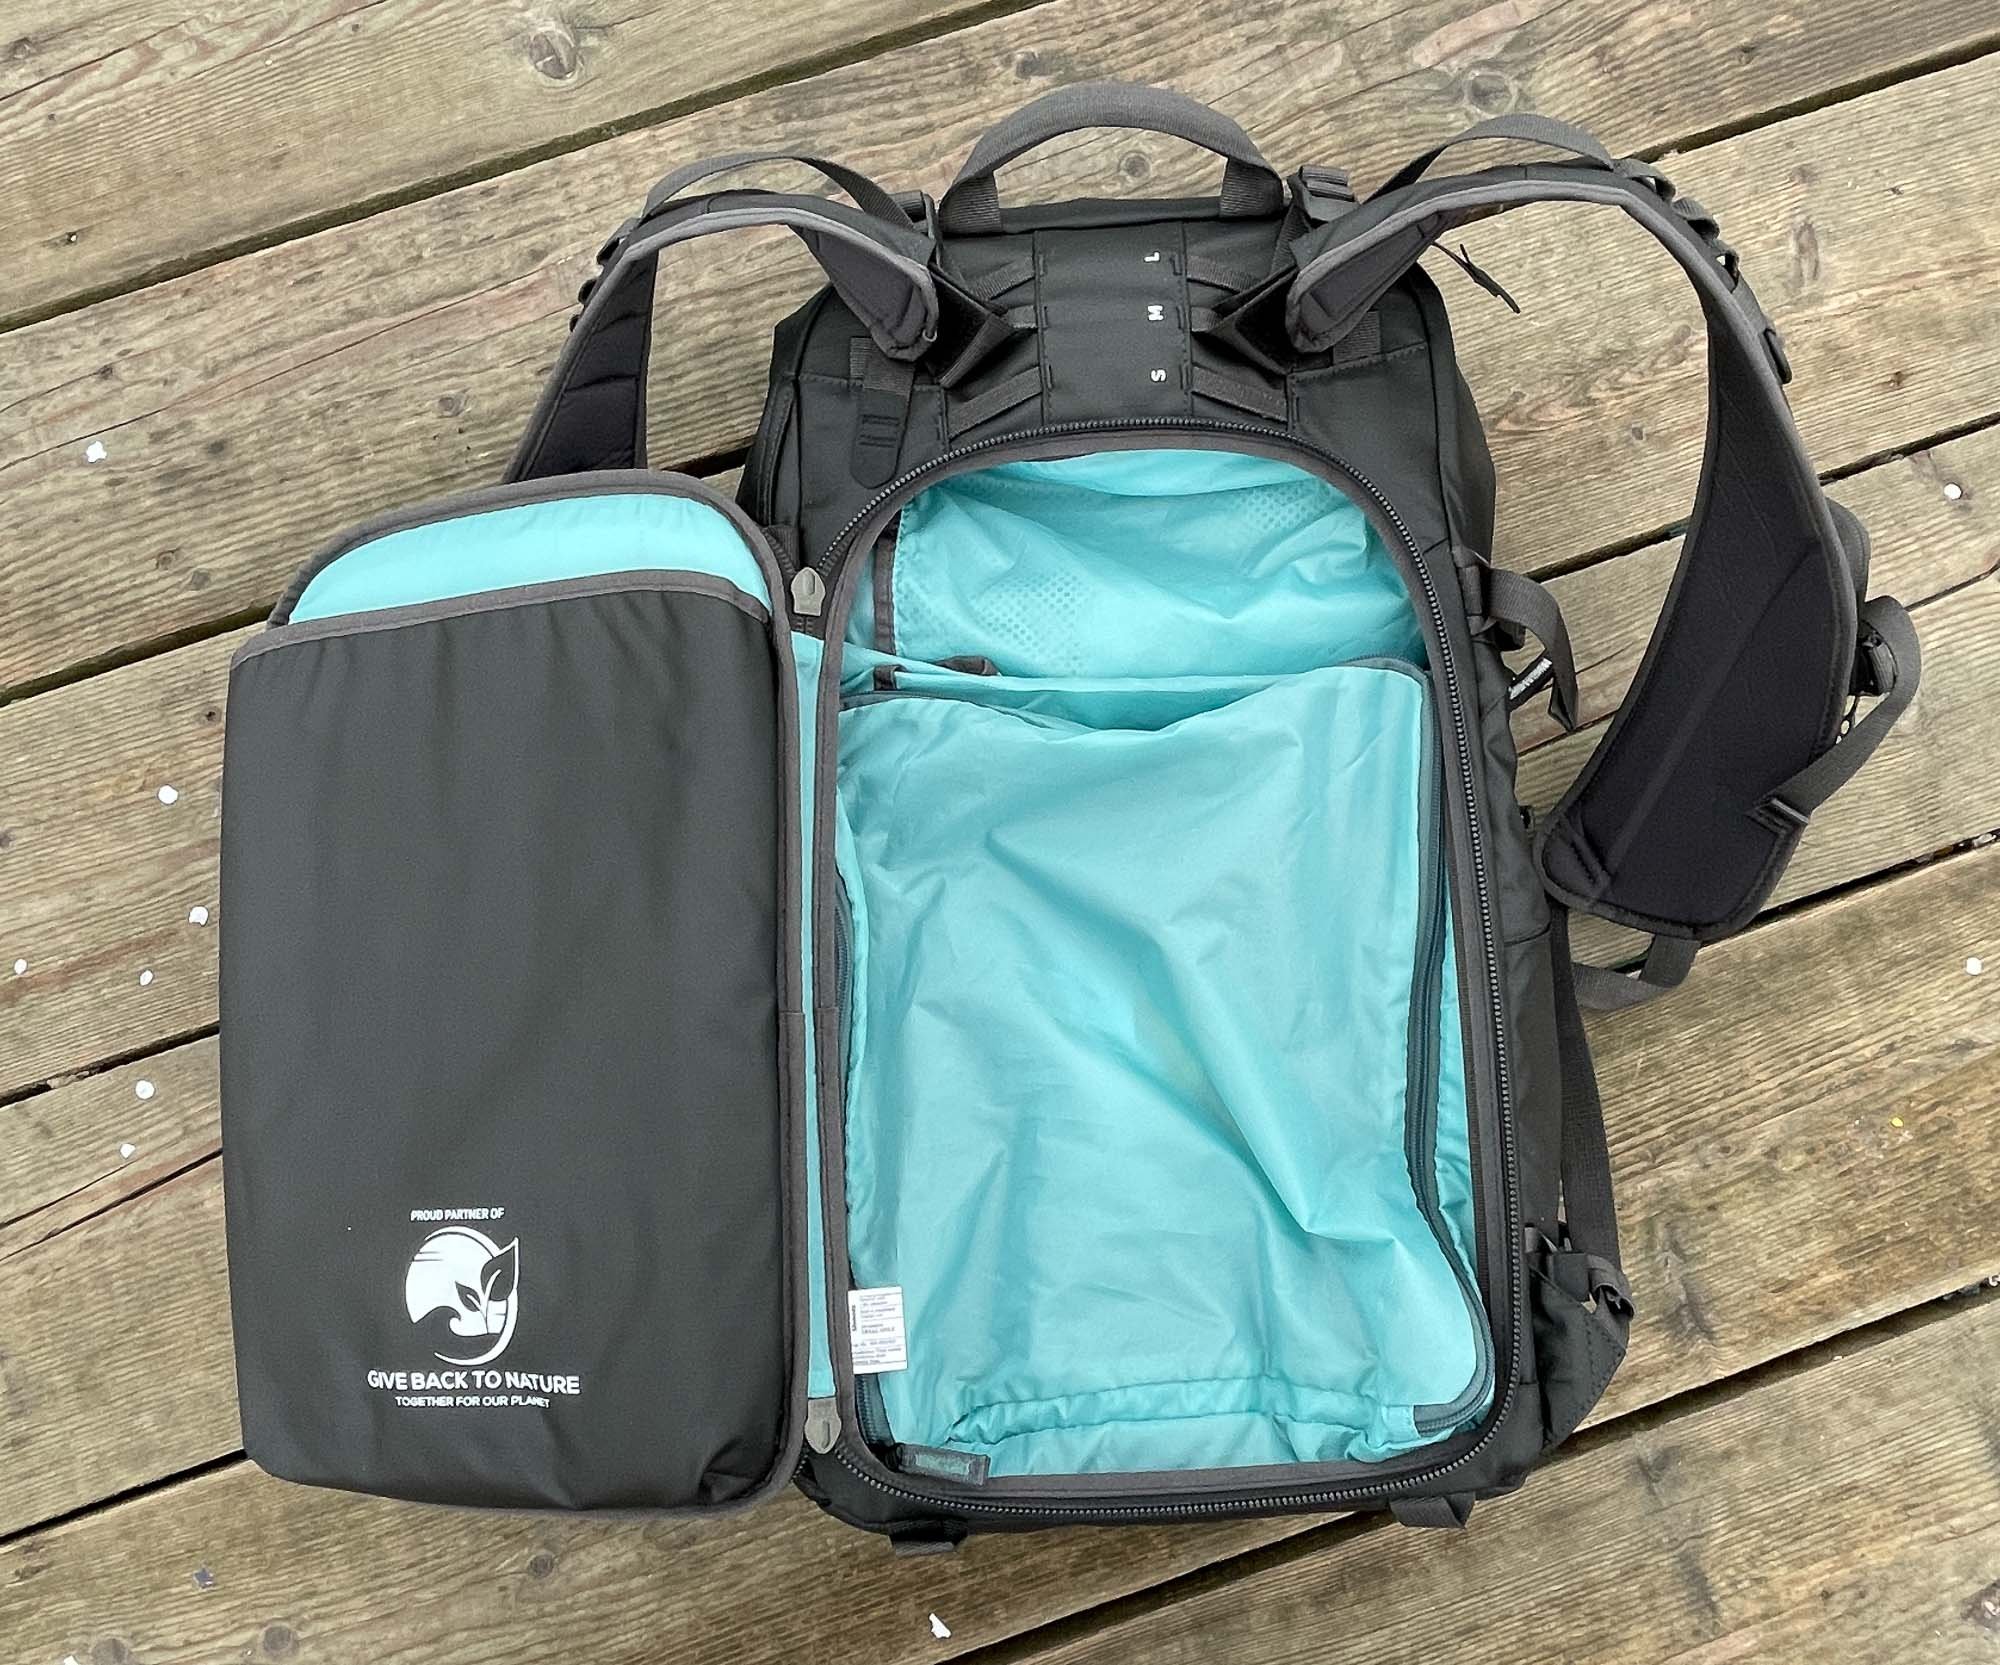
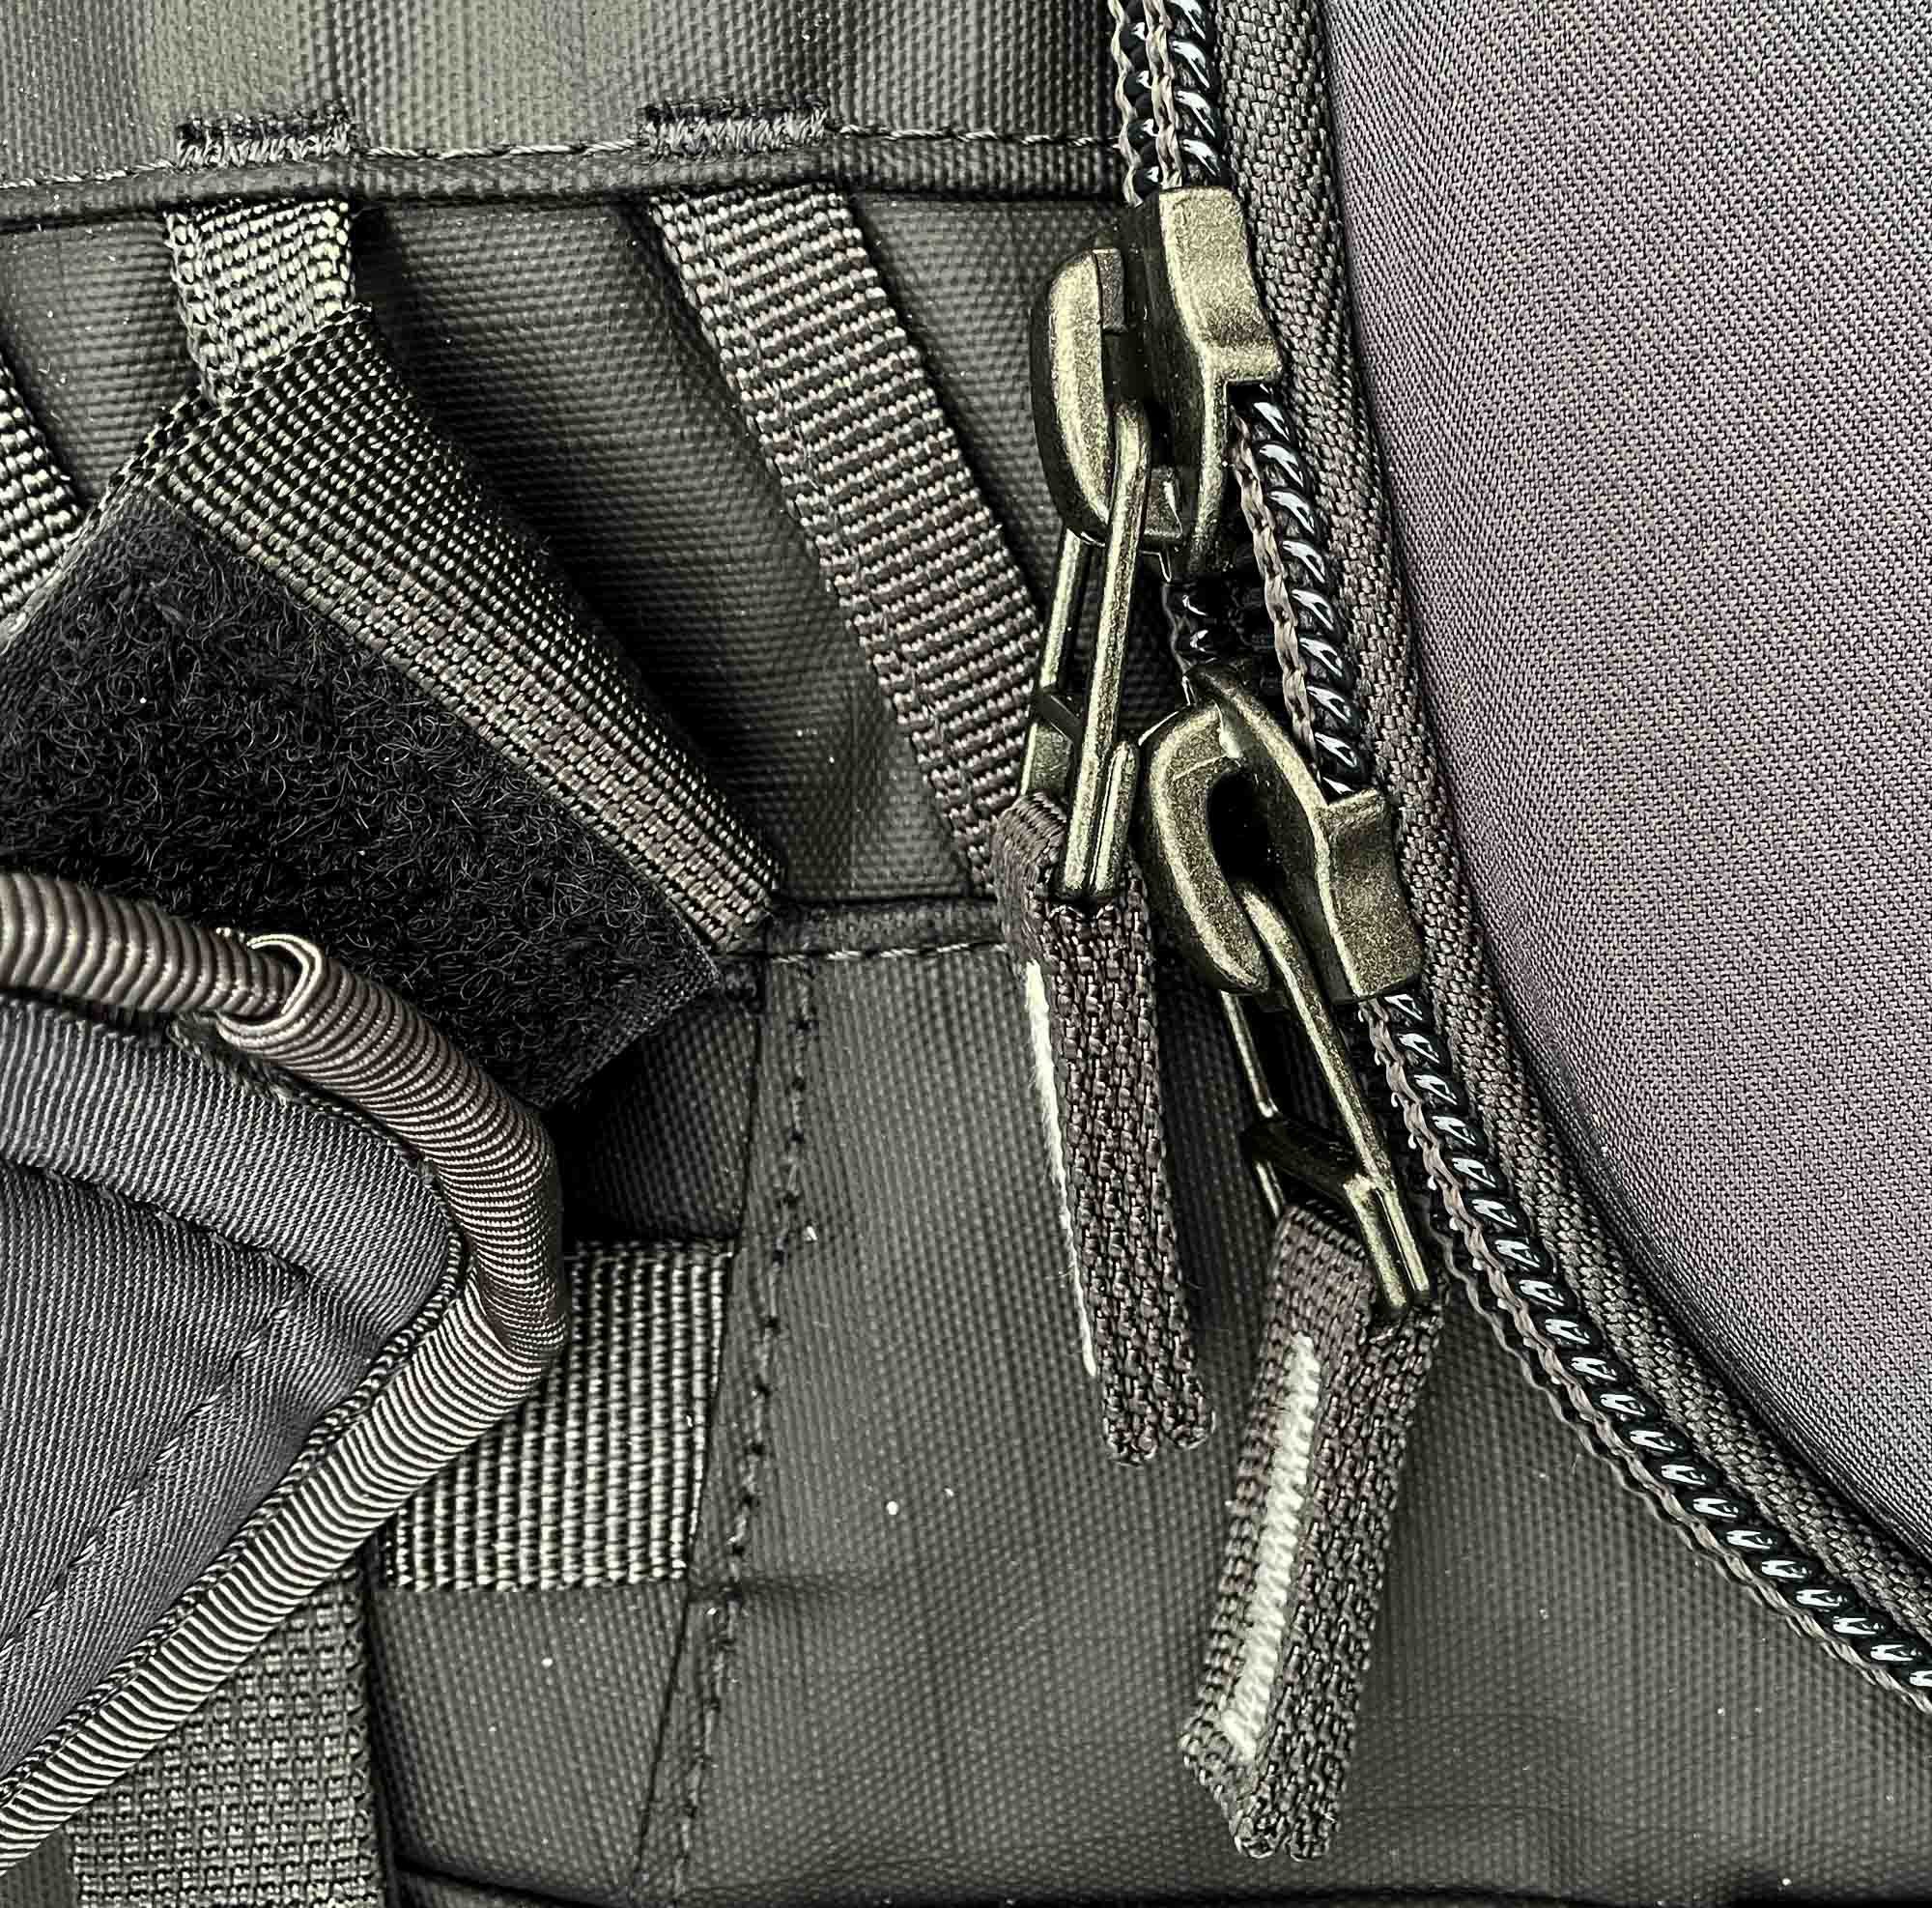
The Shimoda Action X30 backpack offers rear and side access options. The side opening is ideal for quick, under-the-arm access without completely removing the pack, and the rear opening allows wide, unobstructed access to the bulk of your gear for less time-sensitive shooting situations. Side access flap avoids the need to put the pack down to access the camera, useful when shooting on beaches or wet ground.One of my favourite features when I first used Shimoda was the fact that the bag not only opened at the rear, important for safety, but that the flap opened like a book cover rather than folding down vertically. This small change seemed to make it much easier to use. The chunky YKK zips also ran smoothly facilitating easy access. Rear-access also keeps the back of the bag (and your back) dry. Finally, its removable belt makes the Action X30 a stealthy and stylish partner in urban environments, particularly useful for travel.

One of the most important features for me is the expandability of the bag to accommodate extra clothing, food and other accessories. The roll top can expand with a volume range of up to 7 litres. The bag can be adjusted to your gear needs while maintaining a waterproof, tight and compact fit. So in essence I can fit everything that I used to fit into my Explorer 40 into the Action X30 but still retain that sleek fit, a very versatile and useful feature.

There are plenty of pockets on the Action X range. The large front panel pocket is ideal for numerous oversized items like a jacket, sleeping bag or tent or laptop in a padded case.

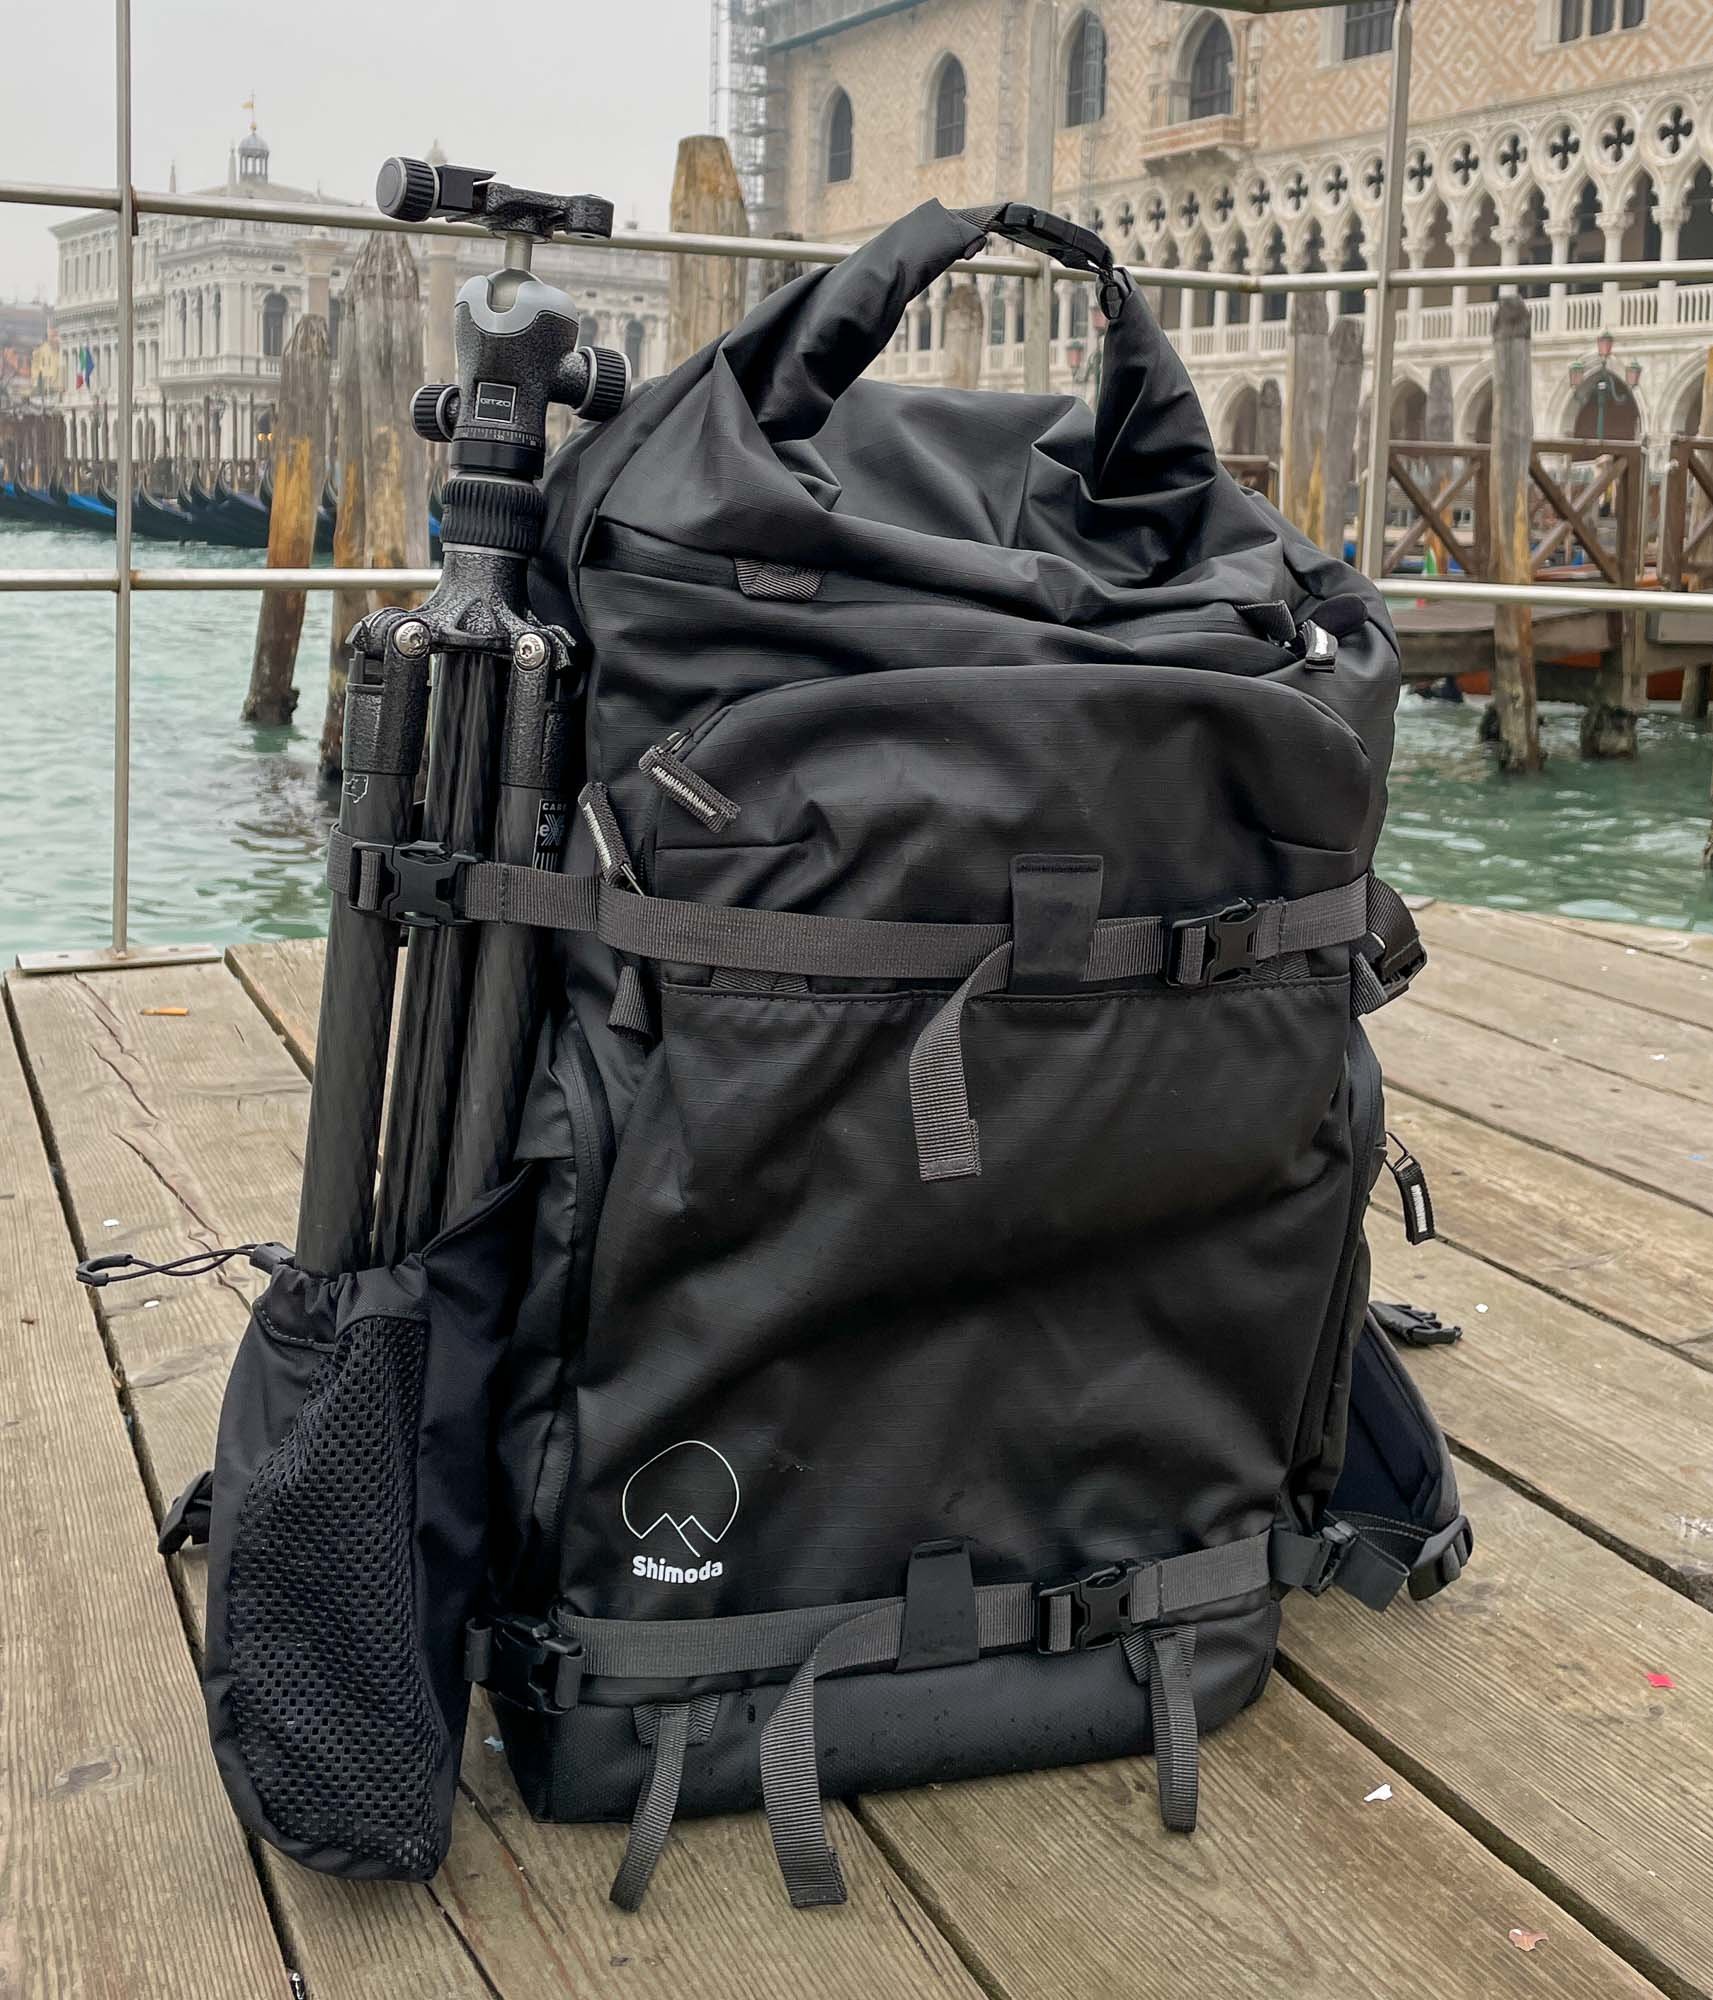
The material feels quality and the use of YKK splashguard zippers allow for easy opening and closing of the bag. A front panel webbing attachment system allows you to carry various photography and mountain tools on the exterior of the pack, such as tripods, skis, ice axes or a snowboard. Each strap features a glove-friendly YKK® side-release buckle.


I like to carry a tripod on the side of the pack and a water bottle or flask on the outside of the main bag. This was not possible on the Explorer 40 which had only one, but huge, pull out pocket. However, on the Action X30 there are pull out pockets on either side, much smaller than previously but still with the ability to carry a pro tripod and large water bottle. A much better solution.

There are times when I need to carry a laptop too and the Action X30 can now accommodate up to a 16” laptop in a sleeve on the inside of the rear flap where it’s well protected.

Finally, all Shimoda products come with a warranty against manufacturer's defects for a period of 5 years after purchase.


The Pro’s and Con’s

Here is a summary of the key pro’s and con’s from my perspective :

• Perfect size to carry camera gear & personal gear within airline carry on limits.

• Roll top flexibility increasing capacity from 30 to 37litres

• Slim profile, great for travel in crowded environments

• Quality, durable materials

• Rear, book style, opening

• Comfortable with adjustable, padded straps

• Removable waist belt

• Pack provides two external (smaller sized) pockets to carry a tripod and water bottle

• Camera Insert not too thick, optimising space available

• Laptop sleeve (up to 16”)

• Stands up

• Plenty of pockets and sub pockets in the bag. Items in top section can’t fall down into bottom section behind insert

• Excellent 5 year warranty

I do have one or two suggestions for improvements :

• There is no waterproof cover included. For how much a cover costs and with a premium priced bag it’s disappointing not to have a waterproof cover included.

• The limited range of colours, black and army green, are uninspiring. I’m sure Shimoda could do much better here.

• The bag is rather expensive. However, there’s a difference between expensive and value for money and given the lengthy list of positive features above I think that it is worth investing in this premium product.

To conclude ….

Based on my experience of Shimoda and the improvements to the previous design which appeared to suit my needs, I was not surprised to find that this bag was superb. The quality is outstanding, it’s so comfortable to carry, the flexibility is excellent and the feature set make this a perfect backpack for travel and landscape photographers – whether or not you’re an “aggressive, all action super hero”!

Action X30v2 Specifications

Weight: 3.74lb / 1.7kg

Outside Dimensions (in): 11.8W x 19.7H x 6.3D in.

Outside Dimensions (cm): 30W x 50H x 16D cm

Inside Dimensions (in): 11.6W x 19.5H x 6.1D in.

Inside Dimensions (cm): 29.5W x 49.5H x 15.5D cm

Laptop Compartment Dimensions - Combined (in): 9.4W x 13.8H x 0.6D in.

Laptop Compartment Dimensions - Combined (cm): 24W x 35H x 1.5D cm

Warranty: 5 Years

Price : £364 including Med Mirrorless Core Unit

More information

For more information on this bag and the wider Shimoda range click the link

BURANO, THE WORLDS MOST COLOURFUL ISLAND!

If children designed towns they would look like Burano!

Rectangular houses painted in a kaleidoscope of colours line up along the canal side. Add in some brightly coloured washing flapping in the warm breeze, a blue sky with fleeting cotton wool clouds and you get the picture!

Probably the most colourful town in Italy, Burano, a small fishing island set within the Venetian lagoon, is just a forty minute ferry journey from Venice and is a photographers nirvana. Although it might seem a wrench to pull yourself away from the stunning and beautiful La Serenissima you should definitely do it as the contrast is amazing. Whilst Venice's mysterious narrow alleys and canals often cast you in darkness, the two-storey fisherman's houses of Burano let the light in and the blue skies shine though.

The theory behind the rainbow palette of houses lining the shores of this small island is that it made it easier for fishermen to find their way home in the mist and gloom. Protected by law, home owners in Burano have to apply for permission to repaint their houses, with only a selected range of colours permitted. Burano pops in the sunshine. It is the “Fujifilm Velvia” of towns.

My groups love their time on Burano, wandering around drinking in the atmosphere and being constantly surprised by an ever more colourful and graphic canvass that seems to present itself at every turn. There is so much to photograph from postcard views down the canals, to graphic colour and minimalist compositions not to mention the locals going about their daily business and of course the tourists always great subjects for a bit of street photography. They usually get so engrossed that they ask for “extra time” – the “referee” is only too pleased to grant it, though not before we’ve enjoyed a wonderful lunch in a canal side café.

If you get the chance to visit this fabulous little island do so, it will be half a day that you’ll never forget.

Siena Awards 2021

I am delighted to announce that in the Siena Awards 2021 I had two images shortlisted and one, Medusa, received a Commendation.

The Siena International Photo Awards is one of the photo contests with the highest international participation with around 50,000 images from amateur and professional photographers from 156 countries worldwide. It is judged by an international panel of experts that includes renowned photographers, editors and photography collectors.

The image was shot on my Infra Red converted Fujifilm XE2s with the XF14mm f2.8

Pretty chuffed!

scroll.jpg

How to photograph bluebells

Spring has sprung in the UK and nothing signifies that more obviously than a rich carpet of bluebells under a vibrant canopy of lime green beech leaves. Walk into a forest early in the morning and the wonderful fragrant smell hits you, the scene simply begs to be photographed. So how do you capture this beauty? Here are a few tips to help you achieve some stunning bluebell shots.

 
20140428_untitled_0206.jpg
 

PLANNING

Time of year : Bluebells appear anytime between mid April to mid May however the peak time is usually around the first week in May.
The timing is critical and local knowledge is key. If you visit too soon the display will be patchy and if you leave it too late the flowers will be past their best and may have been flattened by rain or plenty of pairs of size 9’s!

When to shoot : Bluebells can be photographed in most conditions and bright sunshine can give pleasing dappled effects however technically this is quite challenging especially in managing the contrast and colour. Bright, overcast conditions will result in more natural colours and certainly present fewer problems in controlling the exposure. However my favourite time is early morning when conditions are still and the mist, which is often around at this time of year, adds wonderful atmosphere to your image. Capture the sun as it rises through the trees producing long raking shadows. Sunset is also a good time to shoot making the most of the dramatic lighting.

 
20140428_untitled_0161-Edit.jpg
20160427_bluebells_0174-Edit.jpg
 

EQUIPMENT

You can use any lens to capture the bluebells though my preferred lenses are at either end of the focal range. I use a wide angle (XF10-24mm) to capture the forest and carpet of bluebells then use the longer lens (XF50-140mm) to compress perspective or isolate detail and in this case I usually shoot from a lower position. Of course if you have a macro lens this opens up more opportunities for some delightful close up shots of single heads and other detail.
Shooting in the forest, with typically low light levels, means that a Tripod is a necessity, unless you are looking to specifically produce more creative effects.
You’ll also need a remote release, or use the self timer, to reduce camera shake and you may find a reflector useful too.
A polarising filter will help to reduce glare from leaves and will saturate the colours but remember they are most effective at an angle of 90 degrees to the sun. Neutral Density graduated filters can also help to reduce the highlights in a bright canopy to achieve a more natural effect.

TECHNIQUE

I favour shooting in Aperture priority where I can control the depth of field by using either f8 / f11 to maximise the area of sharpness or a wider aperture, say f2.8 / f4 to minimise the depth of field and throw the background out of focus. Remember your wide angle lens inherently has a greater depth of field at a given aperture than your telephoto zoom.
Focusing is critical to achieve maximum depth of field and there are a number of ways to help achieve this. When using a wide angle lens at f8 / f11 simply focusing a third into the scene can often work. If your foreground isn’t sharp either move back slightly or select a smaller aperture.
I often switch to manual focus and use Focus Peaking to help confirm sharpness by setting my highlights to red. Using the blue depth of field bar at the base of your viewfinder to show the near and far points of focus is another option though I find this useful as a guide it’s not as critical as Focus Peaking.
There are also many smartphone Apps to help you achieve the appropriate depth of field and will help you focus hyperfocally, my favourite is PhotoPills which actually offers a lot more than just depth of field calculations. You can also, using your tripod, take a series of shots focusing at points throughout the image and use focus stacking in post production to achieve that perfect front to back sharpness, but be careful if there is any breeze as you might get ghosting. The latest cameras have automatic an automatic focus stacking feature.
To achieve the best file quality I use the lowest ISO possible.

Providing you are using a tripod the shutter speed doesn’t matter unless there is a breeze. Here you have a choice to increase the shutter speed by increasing ISO to reduce motion blur or to work with the conditions and capture the bluebells and grasses swaying in the breeze for a more dreamy, soft image. Remember to switch off your Image Stabilisation if shooting on a tripod and to use a remote release or the 2 second timer to eliminate camera movement.

Bright light can result in high contrast making getting the right exposure difficult. You should use the histogram to ensure you’re not clipping the highlights but in some cases you may wish to bracket to capture the full range of tones. Use your lens hood to eliminate flare though sometimes you may need to further shield the lens by standing at the side of your camera or by holding your coat up.
Bluebells can appear too purple in bright sunlight and colour casts can be a problem from a vivid green canopy so selecting the correct White Balance is critical. If you shoot JPEGS I suggest using Daylight or 5500k. For maximum control though I recommend shooting in RAW which allows you to correct any colour balance issues in post production.

 
20140428_untitled_0057_Ort.jpg
 

COMPOSITION

Can’t see the wood for the trees? It’s not easy trying to sort order from what at first may seem like a chaotic woodland scene. I usually start by taking the wider views and then move in closer. Look for lines like paths, especially winding ones, which lead the viewer into the picture. Move around to achieve separation between tree trunks and watch out for fallen branches which are easy to miss and often difficult to remove in post production. A sunstar peeping from behind a tree as the sun rises or sets can look great, simply select an aperture of f16 to achieve this effect but be aware of flare which you may wish to emphasise or try and eliminate.
Use your longer lens to isolate detail like a group of tree trunks against a floor of bluebells, a moss covered tree stump or a single flower head, it’s very much a case of less is more. A long lens will also give the impression of a thicker carpet, though watch out for distracting backgrounds such as highlights or other objects and move your viewpoint up and down for a variety of shots.


CREATIVE

Of course there are many other creative options to consider too such as moving the camera whilst exposing (Intentional Camera Movement), multiple exposure or using the Fujifilm Advanced Filters. Panoramic images of the forest can look stunning too. There are so many options, just let your creative juices flow!

 
20160506_bluebells_0355-Ort.jpg
20160508_bluebells_0022.jpg


POST PROCESSING

Your first objective in post processing will be to correct any colour casts using the white balance and tint sliders. Of course these are global changes and specific colours such as the bluebells, tree trunks and leaves can be adjusted locally in Lightroom or Photoshop. Check your exposure for lost highlight and shadow detail and adjust the contrast with Levels or a Tone Curve. Finally, cropping your image can add impact to the shot by excluding distracting elements and concentrating on the important ones. Try a 16:9 crop to eliminate bright patches of sky in the canopy which can often be distracting.


RESPECT

Our bluebell woods are so beautiful and many people want to enjoy them so please don’t spoil this for others just to get your shots. Keep to paths in managed woods and take care not to trample over the bluebells.
We really are so fortunate to have this annual display each year, they don’t last long so make sure you get out there and make the most of one of natures wonders!

 
20160427_bluebells_0176-Edit.jpg
20190426_strelley-207-Ort.jpg